Building a Baroque Guitar
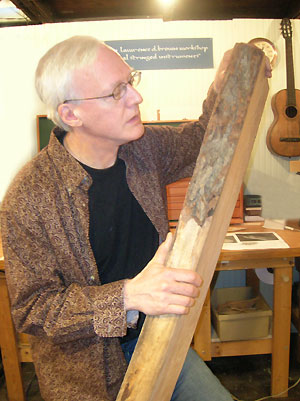 I buy all of my wood in rough billets. This allows me to resaw it with the grain exactly at right angles to the flat side of the board (quartersawn). I only use perfectly quartersawn wood in all of my instruments, simply because it is the only way to insure that the wood will not twist or warp later on. I bought this piece of figured maple from a lumberyard here in Ohio about 30 years ago and stored it in a low-humidity environment. I monitor both my workshop and wood storage areas with certified hygrometers. I buy all of my wood in rough billets. This allows me to resaw it with the grain exactly at right angles to the flat side of the board (quartersawn). I only use perfectly quartersawn wood in all of my instruments, simply because it is the only way to insure that the wood will not twist or warp later on. I bought this piece of figured maple from a lumberyard here in Ohio about 30 years ago and stored it in a low-humidity environment. I monitor both my workshop and wood storage areas with certified hygrometers.
I now get so many requests for baroque guitar plans that I need to direct builders to this page: www.luth.org/plans. This is a technical drawing of a baroque guitar that was measured by R.E. Brune and drawn by John Morgan. Scale length 68.8CM. This guitar may have been owned by Marie Antoinette. 5 double courses, 9 tied frets; highly vaulted back. One sheet 30" x 48". An explanatory article and reduced plan appears in Big Red Book #2. The Big Red Books, published by the Guild of American Luthiers, contain a wealth of information for builders and should be in the reference library of every luthier. Disclaimer: Even though I wrote some of these articles, I make nothing from the sale of these books. |
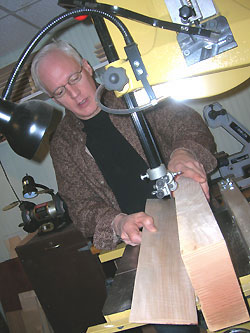 All of my maple is figured (also called fiddle-back, tiger-stripe or flame maple). The chosen billet is sliced into thin sections to get quartersawn back and sides. All of the wood for this guitar will be cut from the same billet, except the soundboard and bridge. My soundboards are always picea abies, also called German spruce, Norway spruce, or violin spruce. This is the classic wood used by violin, lute, and guitar makers in Europe for centuries. Other varieties of spruce work well for steel-string and classical guitars, but are the wrong stiffness to produce a bright, ringing tone with full harmonics on a small, lightly-strung instrument like a lute or baroque guitar. All of my maple is figured (also called fiddle-back, tiger-stripe or flame maple). The chosen billet is sliced into thin sections to get quartersawn back and sides. All of the wood for this guitar will be cut from the same billet, except the soundboard and bridge. My soundboards are always picea abies, also called German spruce, Norway spruce, or violin spruce. This is the classic wood used by violin, lute, and guitar makers in Europe for centuries. Other varieties of spruce work well for steel-string and classical guitars, but are the wrong stiffness to produce a bright, ringing tone with full harmonics on a small, lightly-strung instrument like a lute or baroque guitar.
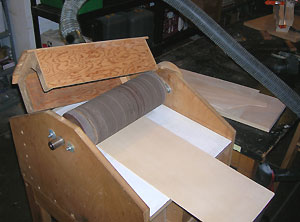 The wood is passed through a homemade thickness sander that takes it down to about 3/32 of an inch thick (2mm). It is then hand-sanded for a final finish. The rotating drum is covered with sandpaper that thins the wood as it is fed through the machine. The white table underneath can be raised with a threaded rod to adjust the final thickness of the wood. Here the dust cover has been removed to show the sanding drum. A shop vac removes about 99% of the dust. The wood is passed through a homemade thickness sander that takes it down to about 3/32 of an inch thick (2mm). It is then hand-sanded for a final finish. The rotating drum is covered with sandpaper that thins the wood as it is fed through the machine. The white table underneath can be raised with a threaded rod to adjust the final thickness of the wood. Here the dust cover has been removed to show the sanding drum. A shop vac removes about 99% of the dust.
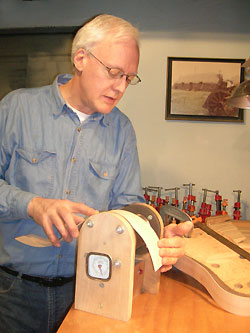 The thin sides are bent over a home-made bending iron, a piece of four inch iron pipe with a heating element inside. A candy thermometer shows the temerature. A little moisture on the wood carries the heat into the cells and permanently bends it into the proper curve. It quickly dries out again as it is bent. The sides in the photo are for a 13-th century citole, a very early kind of guitar. I build most of my own clamps and tools. Nowadays you can buy everything you need from several lutherie supply houses, but I always built my own tools. Over the years, the problem-solving challenges of tool building helped me develop the essential skills I needed for lutherie. Note to beginning luthiers: if you buy all of your clamps, knives, scrapers, planes, and other hand tools you might just miss that opportunity. The thin sides are bent over a home-made bending iron, a piece of four inch iron pipe with a heating element inside. A candy thermometer shows the temerature. A little moisture on the wood carries the heat into the cells and permanently bends it into the proper curve. It quickly dries out again as it is bent. The sides in the photo are for a 13-th century citole, a very early kind of guitar. I build most of my own clamps and tools. Nowadays you can buy everything you need from several lutherie supply houses, but I always built my own tools. Over the years, the problem-solving challenges of tool building helped me develop the essential skills I needed for lutherie. Note to beginning luthiers: if you buy all of your clamps, knives, scrapers, planes, and other hand tools you might just miss that opportunity.
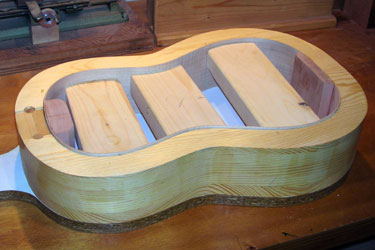 The bent sides are fixed into a mold that holds them in place so that the neck and back can be glued on with a precise fit. The bent sides are fixed into a mold that holds them in place so that the neck and back can be glued on with a precise fit.
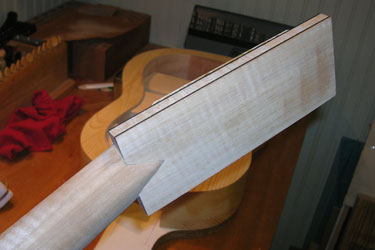
 The joint between the neck and pegbox is critical. A modern classical guitar-style joint won't work because the joint would be visible on the sides of the pegbox. Anyway, I prefer to create the same joints the old makers used. They were drawing on hundreds of years of experience and usually had good reasons for their construction techniques. The following two photos show the finished joint. The joint between the neck and pegbox is critical. A modern classical guitar-style joint won't work because the joint would be visible on the sides of the pegbox. Anyway, I prefer to create the same joints the old makers used. They were drawing on hundreds of years of experience and usually had good reasons for their construction techniques. The following two photos show the finished joint.
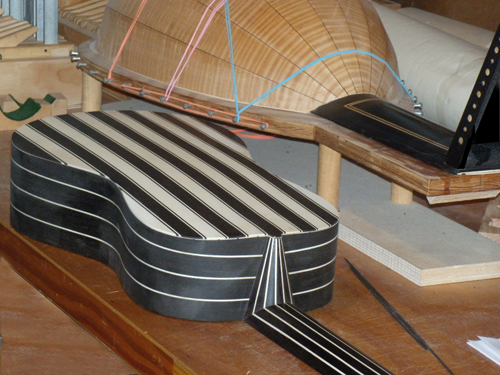
 The pegbox is built by sandwiching layers of ebony with layers of figured maple. It is then fitted to the joint shown in the photo above. The pegbox is built by sandwiching layers of ebony with layers of figured maple. It is then fitted to the joint shown in the photo above.
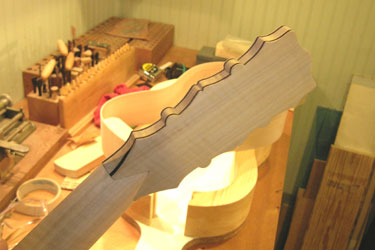 The carved pegbox. Holes still have to be drilled for the pegs. The carved pegbox. Holes still have to be drilled for the pegs.
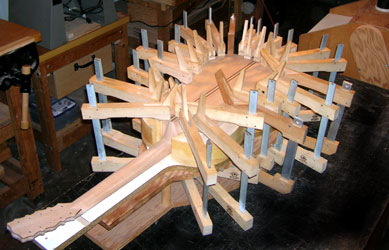 The back being glued onto the sides with many cam clamps, under a very gentle pressure. Too much pressure causes a "starved joint" by squeezing out too much glue. The back being glued onto the sides with many cam clamps, under a very gentle pressure. Too much pressure causes a "starved joint" by squeezing out too much glue.
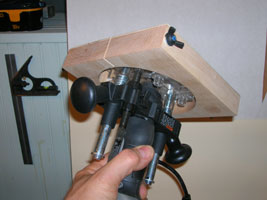 I built this small router base out of wood. It clamps onto the dremel tool and the whole affair clamps onto a table with a router bit sticking up through the small base, as seen in the next photo. I built this small router base out of wood. It clamps onto the dremel tool and the whole affair clamps onto a table with a router bit sticking up through the small base, as seen in the next photo.
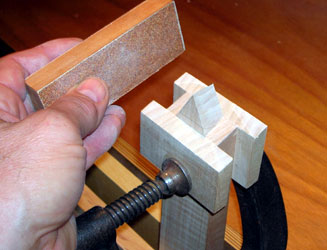
 Since I needed two identical bridge mustachios, I sandwiched two thin pieces of ebony together on top of a thin piece of maple (for support) and cut all three together with a tiny routing bit. After the outside shape was rough carved with this miniature router setup, I filed the the edges with small files to get a cleaner finish. Since I needed two identical bridge mustachios, I sandwiched two thin pieces of ebony together on top of a thin piece of maple (for support) and cut all three together with a tiny routing bit. After the outside shape was rough carved with this miniature router setup, I filed the the edges with small files to get a cleaner finish.
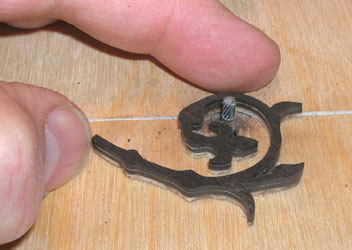
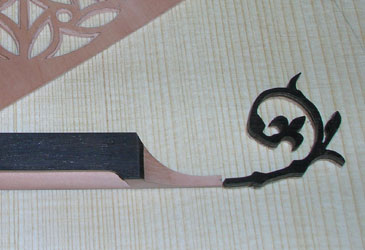 The unfinished mustachio resting next to the bridge. Nothing is glued on yet. I made the bridge out of Swiss pear with a thin ebony cap. The pear will be dyed black. The unfinished mustachio resting next to the bridge. Nothing is glued on yet. I made the bridge out of Swiss pear with a thin ebony cap. The pear will be dyed black.
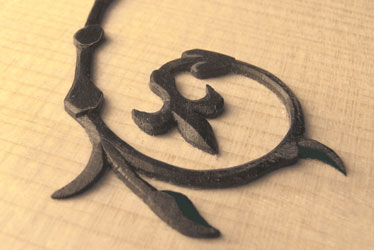
 After the pearwood bridge was dyed black, it was glued onto the soundboard and the mustachio ends were attached. I then added a little bit of relief carving to the mustachios to make them more "organic" looking. After the pearwood bridge was dyed black, it was glued onto the soundboard and the mustachio ends were attached. I then added a little bit of relief carving to the mustachios to make them more "organic" looking.
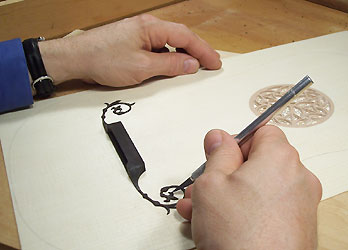
 The finished mustachio endpiece. All the carving was done with a number 11 exacto blade. New blades aren't sharp enough so I whet the edge of the blades on a leather strap charged with polishing compound, much like barbers used to sharpen their razors. The finished mustachio endpiece. All the carving was done with a number 11 exacto blade. New blades aren't sharp enough so I whet the edge of the blades on a leather strap charged with polishing compound, much like barbers used to sharpen their razors.
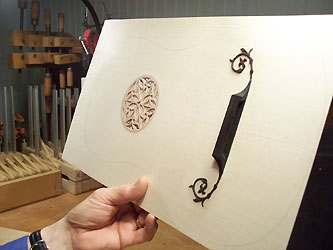
 The rosette was carved in two layers of Swiss pear. The first layer was carved and then glued onto a thin, flat plate of pear with the grain at right angles to the first piece (for strength). The second layer of pear was then carved with the secondary design. It may be asked why I didn't do the conventional inverted "wedding cake" design, with five layers of paper extending down into the instrument. I chose this earlier design because I have seen the paper "wedding cake" rosettes broken out by players, and also because everyone seems to do that one. The rosette was carved in two layers of Swiss pear. The first layer was carved and then glued onto a thin, flat plate of pear with the grain at right angles to the first piece (for strength). The second layer of pear was then carved with the secondary design. It may be asked why I didn't do the conventional inverted "wedding cake" design, with five layers of paper extending down into the instrument. I chose this earlier design because I have seen the paper "wedding cake" rosettes broken out by players, and also because everyone seems to do that one.
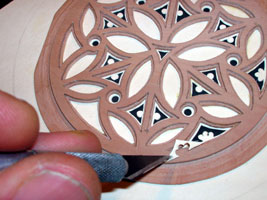 Finally, a piece of stiff parchment paper is glued onto the bottom of the two layers of pear and the tertiary design carved into this paper. Some of the cutting was done with a number 11 Exacto blade. Finally, a piece of stiff parchment paper is glued onto the bottom of the two layers of pear and the tertiary design carved into this paper. Some of the cutting was done with a number 11 Exacto blade.
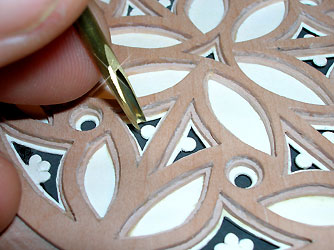 Some of the cutting was done by taking thin brass tubing and grinding the end to the half-round shape that is needed to cut into the paper. The end of the brass tubing can be sharpened on a stone and used to cut out the half-round shape much more precisely than with a knife. Some of the cutting was done by taking thin brass tubing and grinding the end to the half-round shape that is needed to cut into the paper. The end of the brass tubing can be sharpened on a stone and used to cut out the half-round shape much more precisely than with a knife.
 The finished soundboard with the rosette glued in place and the bridge glued on. A more detailed description of rosette carving can be found on the Baroque Guitar Rosette Carving page. The finished soundboard with the rosette glued in place and the bridge glued on. A more detailed description of rosette carving can be found on the Baroque Guitar Rosette Carving page.
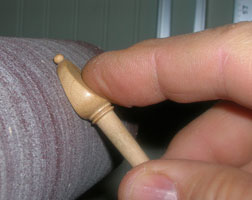
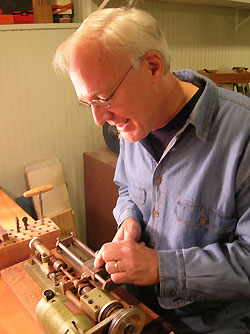 I built a miniature pattern follower to turn pegs on my little Unimat metal lathe. I set the angle of the pattern follower to exactly match the taper of the violin tapered reamer that I will use to ream out the pegholes in the pegbox. This insures a precise fit with smoothly turning pegs. I built a miniature pattern follower to turn pegs on my little Unimat metal lathe. I set the angle of the pattern follower to exactly match the taper of the violin tapered reamer that I will use to ream out the pegholes in the pegbox. This insures a precise fit with smoothly turning pegs.
 The flat side of the pegs is achieved by holding the rounded peg against a disc sander. The surface is finished with fine sandpaper and polished on a soft cloth. The flat side of the pegs is achieved by holding the rounded peg against a disc sander. The surface is finished with fine sandpaper and polished on a soft cloth.
 Curved peg sides are achieved by holding the peg against a sanding drum. Curved peg sides are achieved by holding the peg against a sanding drum.
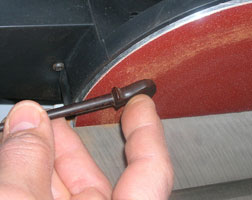
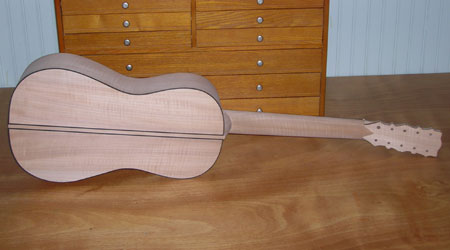 The finished guitar "in the white", waiting to be varnished. I used solid ebony bindings around the back and around the soundboard, to prevent dents when the edges of the instrument are bumped into something. The ledges for the ebony bindings are cut by hand. Because the back has a pronounced arch to it, a small router jig will not give the right shape or depth of cut. I use a violin-maker's purfling knife. The finished guitar "in the white", waiting to be varnished. I used solid ebony bindings around the back and around the soundboard, to prevent dents when the edges of the instrument are bumped into something. The ledges for the ebony bindings are cut by hand. Because the back has a pronounced arch to it, a small router jig will not give the right shape or depth of cut. I use a violin-maker's purfling knife.
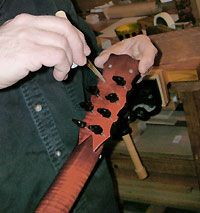 Fitting the tuning pegs. Ebony is probably the worst wood to use for pegs because it goes out of round and pops loose in the hole. This is caused by a very high ratio of tangential to radial shrinkage--i.e., the wood shrinks twice as much in one direction as in the other. Historically, makers used fruit woods which have a low T/R ratio and do not go out of round as much as ebony. I use European plum. A well-fit, thin peg gives a one-to-one tuning ratio and makes tuning quick and easy. A small diameter makes tuning easier. Wooden pegs are much lighter than a set of ten worm gears and make the instrument better balanced and easier to hold. Metal tuning gears are definitely not an improvement. Pegs also just look better. Makers who use fat, ebony pegs have given wooden pegs a bad rep. Fitting the tuning pegs. Ebony is probably the worst wood to use for pegs because it goes out of round and pops loose in the hole. This is caused by a very high ratio of tangential to radial shrinkage--i.e., the wood shrinks twice as much in one direction as in the other. Historically, makers used fruit woods which have a low T/R ratio and do not go out of round as much as ebony. I use European plum. A well-fit, thin peg gives a one-to-one tuning ratio and makes tuning quick and easy. A small diameter makes tuning easier. Wooden pegs are much lighter than a set of ten worm gears and make the instrument better balanced and easier to hold. Metal tuning gears are definitely not an improvement. Pegs also just look better. Makers who use fat, ebony pegs have given wooden pegs a bad rep.
The back and sides are book-matched. I decided to do a dark red violin-style finish since the instrument was made of figured maple. The next baroque guitar that I built was made from black ebony and white holly with a clear finish. Here it is still under construction.
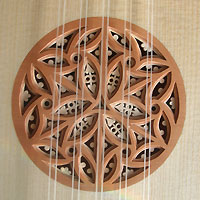 The finished rosette. This rosette was inspired by an historical rosette, but is not an exact copy. The strings are made from gut, called catgut but actually made from lamb intestine. They give a much brighter, more percussive sound than nylon strings. Since the object of building historical instruments is to create something as close as possible to the sound of the instruments used in the historical time period, it would'nt make sense to use nylon. There are no bourdons, or basses on this particular guitar as it uses the tuning required by Gaspar Sanz: e'e' bb gg d'd' aa (from the top down). This is a re-entrant tuning, as the d' is pitched higher than the a and g. Some composers requested a bourdon (bass string) with the d. For this the tuning would be e'e' bb gg dd' aa with the bass d string on the inside. Excellent gut strings can be had from many sources. See: Lute Strings. The finished rosette. This rosette was inspired by an historical rosette, but is not an exact copy. The strings are made from gut, called catgut but actually made from lamb intestine. They give a much brighter, more percussive sound than nylon strings. Since the object of building historical instruments is to create something as close as possible to the sound of the instruments used in the historical time period, it would'nt make sense to use nylon. There are no bourdons, or basses on this particular guitar as it uses the tuning required by Gaspar Sanz: e'e' bb gg d'd' aa (from the top down). This is a re-entrant tuning, as the d' is pitched higher than the a and g. Some composers requested a bourdon (bass string) with the d. For this the tuning would be e'e' bb gg dd' aa with the bass d string on the inside. Excellent gut strings can be had from many sources. See: Lute Strings.
|